Samsung returned its Chromebook lineup with a fresh model—the first one since 2011.
Designed to run on Google’s lightweight Chrome OS, Chromebooks focus on web-based tasks and typically cost less than Windows or macOS laptops.
Previously, enjoying Apple Music on these devices involved a few extra steps, but that’s no longer true.
Apple Music now works seamlessly on Chromebooks. Users can install the app from the Google Play Store and stream their music collections without hassle.
This guide explores several ways to effortlessly access Apple Music on a Chromebook.
Part 1: Using Apple Music on a Chromebook
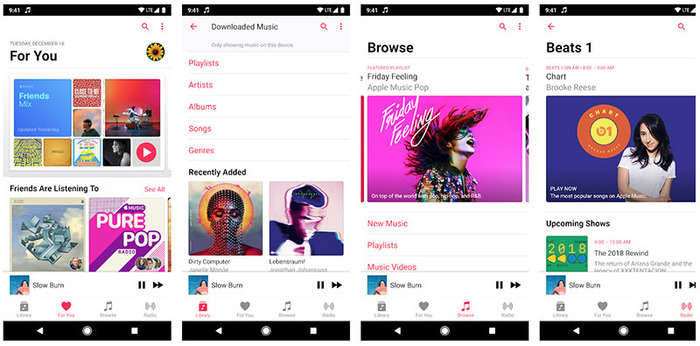
Users of lightweight laptops can now install a popular audio streaming platform previously limited to other systems.
Through the built-in digital store, these devices can run the application and give access to saved songs, collections, and music libraries.
While the layout and performance might differ slightly from other gadgets, essential features—like a refreshed browsing section—remain available.
Despite possible performance gaps, the service remains dependable for those using lightweight computing devices within that digital ecosystem. Some users even explore how to get Windows on a Chromebook to enhance compatibility with other desktop apps.
Guide to Setting Up Apple Music on Your Chromebook:
- Tap the launcher menu to view all applications.
- Open the built-in software marketplace.
- Type the name of the music platform in the search field and start the search.
- Choose the correct option from the results to open its installation page.
- Select the button to begin the download and setup process.
- After it finishes, locate the new app in the device’s app list or by using the search tool.
- Run the app and log in using the account linked to the service.
- Once signed in, begin streaming, exploring curated lists, or playing your favorite tracks directly from the device.
Part 2. Ways to Enjoy Apple Music on a Chromebook
You can play songs on a web-enabled laptop in various ways—through an online platform, a compatible software tool, or by converting tracks for offline use.
Streaming through a browser offers quick access to essential features while converting tracks into standard audio formats, which allows you to listen anytime, even without a connection.
Using an Installed Music App:
- Launch the audio program from your system’s main menu or dashboard.
- Sign into your account if prompted; if your device already recognizes your details, it might do this automatically.
- Browse your saved content, playlists, or albums through the side menu.
- Use the search feature to locate specific tracks or artists.
- Select a title and begin listening.
- Use the on-screen controls to play, pause, or skip as needed.
Streaming Through the Browser:
- Open your preferred internet browsing tool.
- Enter the streaming site’s address in the search bar and press enter.
- Log in with your credentials.
- Look through your saved collections, recommended selections, or recent additions.
- Search for particular tracks, albums, or artists using the provided field.
- Click any item to begin playback directly from the webpage.
- Use the integrated controls to adjust settings such as volume or track position.
Listening with a Local Audio Player:
Conversion software can change protected music files into widely accepted formats like MP3 to enable offline access.
After converting, you can open these tracks using any audio player installed on your device.
This method allows you to enjoy music without an active subscription or internet access.
Part 3. How to Save Music for Offline Listening on a Laptop

Streaming music through various services works well, but it doesn’t always suit those who want access without interruptions, primarily when offline.
While some services allow temporary downloads, those files usually become inaccessible once the subscription expires.
Buying individual tracks in standard formats is one solution, but there’s a more versatile method to store and play your music on a laptop.
Many streaming services apply restrictions to downloaded content, making it impossible to play on other devices if you stop your subscription.
Meanwhile, laptops can handle audio formats such as MP3, WAV, and others that most media players support, ensuring a smooth experience without interruptions.
Converting your audio files to these standard formats makes them more portable and easier to manage.
Software that converts audio files allows you to save music in widely supported formats compatible with your laptop.
Such programs often support streaming content, digital books, and previously purchased audio files, consolidating your entire collection for easy access.
After installing the conversion software, follow these general steps to prepare your audio for easy access on your laptop:
Step 1: Import Audio Files into the Converter
Open the audio conversion software and load your music files with the “add” option.
You can search for files on your device or simply drag them into the program. Some tools also allow you to import music directly from your library.
Step 2: Select Desired Output Format and Customize Settings
Go to the format section and pick a compatible file type like MP3. Most tools offer several options, like AAC, WAV, and FLAC.
You can adjust settings like bit rate, sample rate, and channels to suit your preferences.
Step 3: Start the Conversion Process
Click the button to start converting your music into the selected format. The conversion removes limitations, enabling you to use the files on different devices.
Once complete, find the transformed files in the program’s history or output folder.
After converting, move the files to your laptop using USB drives, cloud services, or file transfer apps.
Once transferred, you can enjoy them using any compatible media player, with no ongoing subscription required.
Using a Portable Storage Device:
- Ensure the portable storage device remains unprotected by encryption.
- Connect the storage device to a port on your system.
- Move the audio files into the designated folder on the storage device.
- Eject the storage device safely from your system.
- Plug the storage device into a port on the secondary device.
- Log in to the secondary device.
- Open the application that allows access to files on the screen’s corner.
- Locate the files stored on the storage device using the file management tool.
- Select the desired files and open them.
- The audio will appear in a media viewing app and be ready for playback.
Using Cloud Storage:
- Launch a web browser on your system and access your cloud storage service.
- Log in to your storage account.
- Choose the option to upload a file or folder based on your needs.
- Select the desired audio files or folders in the pop-up window to upload.
- Open the file management application on the secondary device and access the cloud storage service.
- Log in with the same account used to upload the files.
- Locate the audio files within your cloud storage.
- Choose the files you wish to play.
- Open and play the selected files using the built-in media player or directly in the browser.