Capturing images on a Chromebook in 2025 is easier than it looks.
Though it doesn’t function like a phone or digital camera, it still lets you take clear and quick photos.
Whether you’re using the built-in tool or extra software, your Chromebook offers many ways to snap and save your moments.
This manual will show you how to take photos on Chromebook, use video tools, and enhance your pictures with editing apps.
Launching the Default Camera Tool on Chromebook
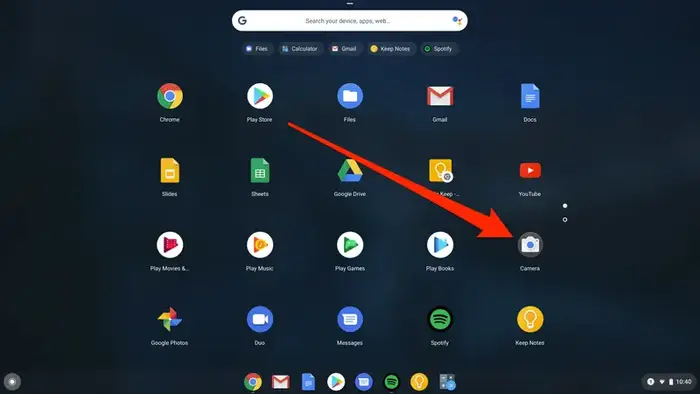
Your Chromebook already has a built-in photo app that lets you take pictures easily. Here’s how to find and open it:
| Steps | What to Do |
| Access App Launcher | Tap the circle at the bottom left of the screen |
| Find the Camera Option | Search for “Camera” |
| Open the App | Click it once it appears |
You’re now ready to take a photo using your Chromebook.
Taking a Snapshot with the Camera App on Chromebook
When you launch the camera, it turns on by itself and shows you a live preview. To snap a photo:
- Press the camera icon (usually a circle or square).
- The photo will save automatically.
Helpful Hints for Sharper Images:
- Zoom In: Use the digital zoom feature if it’s available.
- Hold Steady: Keep your device still or use a stand.
- Use Good Lighting: Make sure the room has enough light, or take photos near windows.
Recording Video Using the Camera App on Chromebook
Your Chromebook also lets you record video. If you want motion content, here’s how:
- Start the Camera tool.
- Switch to video mode by clicking the video icon.
- Press record to start and tap again to stop.
This is great for short clips, tutorials, or school projects.
Add-on Apps for Advanced Photo Options
If you need more features than the default camera offers, third-party apps can help improve your photos.
Use Google Photos to Manage and Edit
Google Photos helps you store and change your images. Once your photo is saved:
- It’s automatically backed up (if logged into your account).
- You can brighten, crop, or add filters.
- You can create custom albums, too.
Try Snap Camera for Creative Effects
Snap Camera adds fun filters and effects to your Chromebook pictures.
| Steps to Use Snap Camera | What to Do |
| Install the App | Download from the Snap Camera website |
| Choose Your Built-in Camera | Pick your Chromebook webcam as input |
| Select a Filter | Try different looks and styles |
| Take Photos Using the Filters | Use your camera with the chosen effects |
This is popular for fun posts, social media, and video calls.
Connect Other Cameras for Better Quality
For high-end results, attach external cameras to your Chromebook.
| Ways to Connect | Details |
| Use a USB Cable | Plug in your webcam or DSLR |
| Record with Any App | Open the camera app or OBS to take pictures |
This is useful for creators or pros who want crisp images.
Bluetooth Camera Connection
You can also pair Bluetooth cameras or phones to click from a distance, giving you more freedom to move while snapping.
Fixing Camera Problems
Sometimes, your Chromebook camera might not work as expected. Here are some solutions:
- Camera Not Detected: Give camera permission and restart your device.
- Blurry Images: Keep still and ensure the area is bright enough.
- Missing Pictures: Check the save location or look in Google Photos.
Wrap-Up
If you’ve ever wondered how to take photo on Chromebook, now you know.
With the built-in tools, third-party apps, and external devices, taking and editing pictures is smooth and flexible.
You don’t need fancy gear—just creativity and the right setup. Whether for fun or work, your Chromebook can handle your photo needs with ease.