Just getting started with a Chromebook and not sure how to move photos from your iPhone? Or maybe you’re new to the iPhone and still figuring out how everything works?
No stress – it’s actually pretty simple. In this article, we’ll walk you through how to sync your iPhone with a Chromebook. And a small spoiler – there’s more than one way to do it. But let’s start with a different process.
Clean Your Photo Library Before Transferring to Chromebook
Before you transfer photos from your iPhone to your Chromebook, take a minute to tidy up your library. That way, you won’t have to wade through a bunch of extra shots and can quickly grab the ones you actually want.
You have two main options for this: manually selecting and deleting photos yourself, or using a photo cleaner app. We recommend going the app route – it’s faster and easier. In this section, we’ll discuss how it works with Clever Cleaner for iPhone (free), but most photo-cleaning apps function pretty similarly.
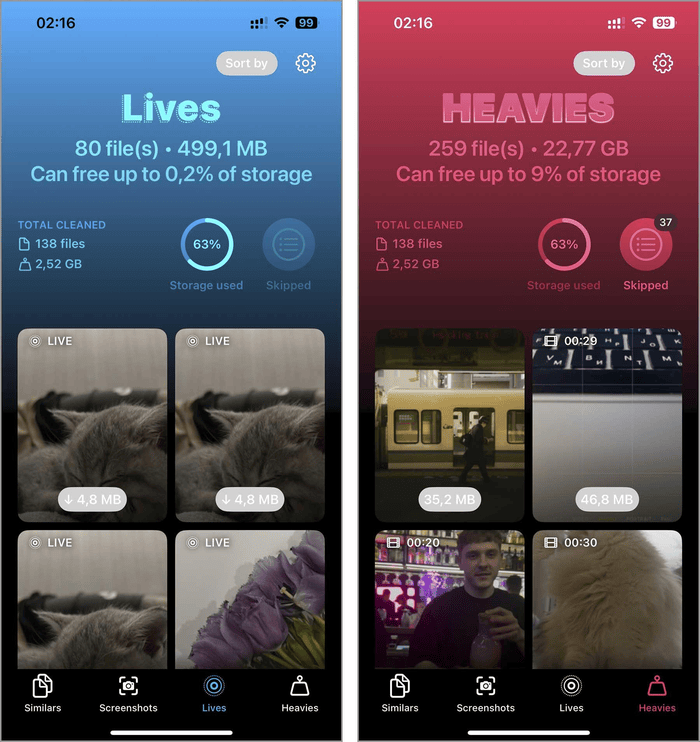
As for Clever Cleaner, it packs four key features to help you manage every type of image on your iPhone. Here’s a quick rundown of what each one does:
- “Similars” feature removes duplicates and similar-looking photos on iPhone. It groups your images together and uses AI to pick the best shot in each set, marking the others for deletion. That way, you can easily clear out extra copies with just a few taps.
- “Screenshots” tool gathers all your screenshots in one place, showing you their file sizes. You can delete them all in one go or choose specific ones to get rid of.
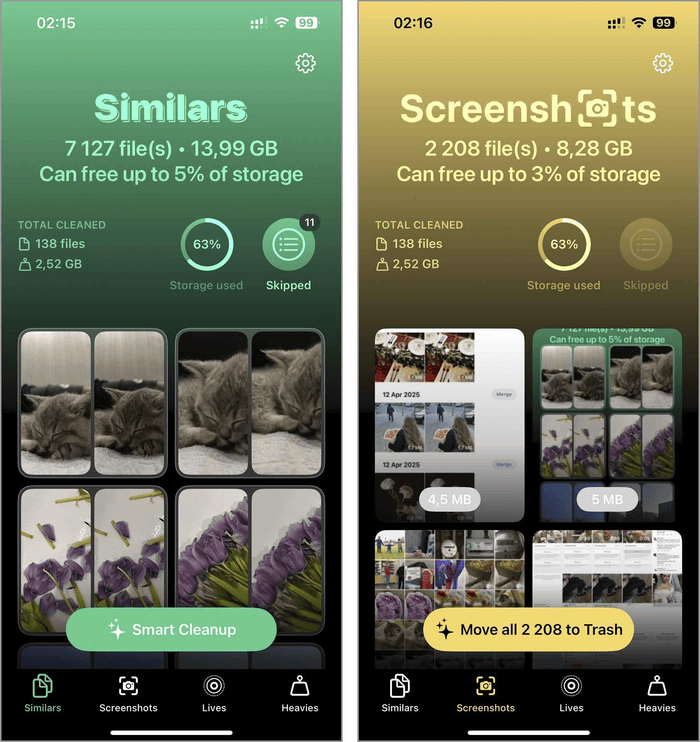
- “Lives” feature converts your Live Photos into regular still images, shrinking their file size. You can choose whether to keep the original Live versions or delete them after compression.
- “Heavies” option helps you handle your largest files, mostly videos, but it also identifies any photos bigger than 25 MB, giving you an easy way to delete them if needed.
Since it’s hard to know which types of files are cluttering your photo library the most, we won’t go into step-by-step instructions here.
But once you download the app, you’ll see it’s pretty intuitive. If you want some guidance, check this guide to deleting duplicate iPhone photos, or take a full overview of each feature on the app’s official website.
How to Connect an iPhone to a Chromebook for Photo Transferring?
Alright, now let’s talk about how you can connect your iPhone to a Chromebook to transfer photos. Reddit users who are new to ChromeOS or thinking about switching often mention that they’re a bit confused by how it works. And it’s no surprise.
ChromeOS isn’t macOS or Windows – it has its own perks and quirks. Still, moving photos from your iPhone is dead‑simple. The go‑to method is plugging in with a USB cable, but if that cord’s gone missing, you’ve got a couple of easy wireless options, too. Here’s the lowdown on each approach so you can pick what works best.
Method 1: Transfer Photos via USB Cable
Surprisingly, when you search for how to move files from an iPhone to a Chromebook, using a USB cable doesn’t always come up, even though it’s hands down the simplest method. If you’re moving a whole batch of photos, this method is a lifesaver – and because it’s a straight cable connection, you don’t even need Wi‑Fi.
That said, here are a few things to keep in mind. This method only works with photos that are saved locally on your iPhone. If some of your photos live in iCloud only, you’ll need to download them to your device first.
Also, it won’t transfer images stored in the Files app or other apps – only those in your main camera roll. And most importantly, make sure you’re using a legit cable and a working port. If not, the transfer might not even start, or worse, it could corrupt your photos.
- Confirm you’re using an Apple-certified Lightning or USB-C cable and that your Chromebook has a compatible USB port.
- Plug the Lightning/USB-C end into your iPhone and the USB end into your Chromebook.
- Unlock your iPhone. A pop-up will ask if you trust this computer – tap ‘Allow’.
- Open the Launcher (bottom left) on your Chromebook and launch Files. You’ll see your iPhone listed as a connected device – click it to browse your photos. Click it to access its internal storage.
- Go to the DCIM folder, where all your camera roll photos are stored.
- When you spot the ones you want, either drag them into any folder on your Chromebook or right‑click and hit ‘Copy’ to paste them wherever you like.
- When you’re finished, right‑click your iPhone in Files, choose Eject,’ and then unplug the cable.
Method 2: Use Google Photos for Cloud Sync
If you don’t have a cable handy (or just want to keep things wireless), Google Photos is another option for using your iPhone with a Chromebook to transfer photos. It works much like iCloud does for Apple devices – just turn on backup & sync in the Google Photos app, and your new shots upload automatically to the cloud.
Then you can pull them up on your Chromebook (or any device with your Google account), and they won’t take up local storage unless you download them. By the way, this method also helps clean storage on your iPhone – once your photos are backed up to the cloud, you can go ahead and delete them from your device.
That said, it’s not without its downsides – you’ll need a solid Wi‑Fi connection and patience (uploading a huge gallery can take a while), and the free 15 GB Google account storage is shared across Photos, Gmail, and Drive. If you think you’ll need more room, consider upgrading to a paid plan (100 GB or more).
- Download Google Photos from the App Store on your iPhone.
- Open the app and sign in with your Google account. Don’t have one? You’ll need to create it first.
- Once you’re in, go to Settings and turn on Backup & sync. This will automatically upload your photos to your Google account.
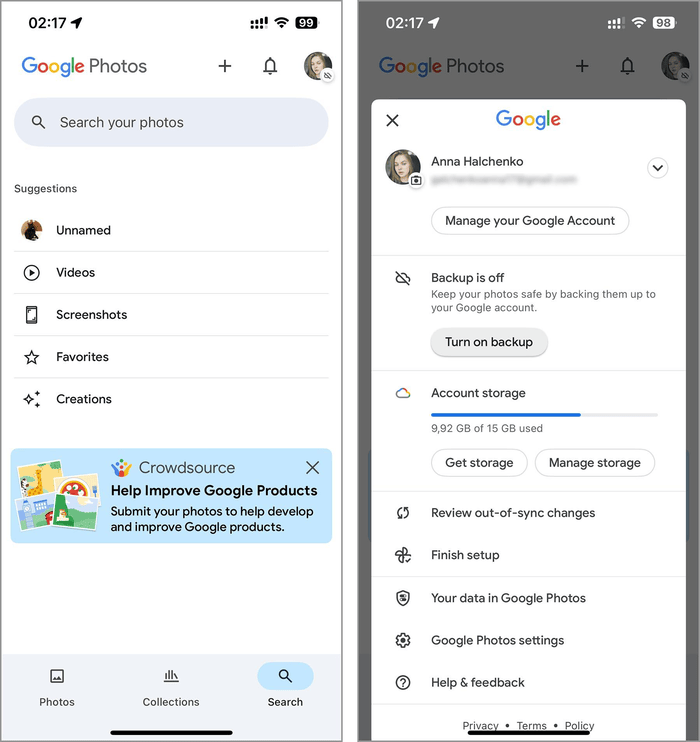
- You’ll also get to choose your upload quality: high quality gives you free unlimited storage (with slight compression); original quality keeps your full resolution but uses up your Google storage.
- On your Chromebook, open Chrome and go to photos.google.com. Sign in with the same Google account to access all your synced photos.
- If you want to save a photo to your Chromebook, just click on it and hit Download. And don’t forget – check your storage now and then. If you’re running low, you can clear out old photos or upgrade your plan for more space.
You can also go with other cloud services like Dropbox or iCloud to transfer your photos the same way. Just keep in mind – if you’re using iCloud and you delete a photo from your iPhone, it’ll also disappear from iCloud unless you’ve already downloaded a copy to your Chromebook. That’s super important to remember so you don’t accidentally lose anything.
Method 3: Wireless Transfer via Snapdrop
The last method we’ll cover for transferring photos from an iPhone to a Chromebook is using a wireless file-sharing service over the same Wi-Fi network. It works kind of like AirDrop for iPhones. Just open the site on both your iPhone and Chromebook, and you can send photos directly through the browser.
We’ll walk you through how it works using Snapdrop as an example. This method is perfect for sending just a few photos.
- Just make sure you’ve got a solid Wi‑Fi connection and that both your iPhone and Chromebook are on the same network, because Snapdrop won’t work otherwise.
- Open a browser on each device and go to snapdrop.net. You’ll see each device appear on the other’s screen, usually with a generic name or icon.
- On your iPhone, tap the Chromebook icon and select ‘Photo Library’ to browse your photos.
- Pick the photos you want to send. You can select more than one at a time.
- Once you’re ready, tap ‘Done.’ The transfer will begin right away.
![]()
- Your Chromebook will show a prompt to accept the incoming files. Hit ‘Accept,’ and the photos will download to your default folder – usually ‘Downloads.’
- Open that folder to make sure everything came through correctly.
Final Thoughts
We’ve gone over all the different ways you can transfer photos from your iPhone to your Chromebook.
Hopefully, you found the option that works best for you, and saw for yourself that the process is a lot simpler than it might seem at first. It’s really not much different from transferring photos to a Windows PC or Mac. While getting familiar with ChromeOS and your iPhone, don’t forget you can also bookmark on iPhone useful tools or pages to access them quickly later. We hope this guide helped you out, and that your time using your Chromebook only gets better from here.