Using Google Chrome’s Autofill feature can save you a lot of time. It conveniently stores information like your name, email address, physical address, phone number, and even your payment methods.
This way, you don’t have to retype the same details each time you fill out a form online.
However, there may come a time when you need to update this data—perhaps you’ve changed email providers, or your bank has issued a new card.
In such situations, knowing how to manage your Autofill data is essential.
This article covers how you can view, edit, delete, or turn off Autofill entries in Chrome.
Whether you’re using a desktop, Android, or iOS device, the steps outlined below will help you take full control over the personal details stored in your browser.
Clearing Autofill Data on Chrome
The process for removing Autofill data depends on the type of device you’re using. Here’s how to do it on a desktop computer:
- Launch Google Chrome.
- Click the three-dot menu in the top-right corner of the browser window.
- Hover over More tools, then choose Clear browsing data.
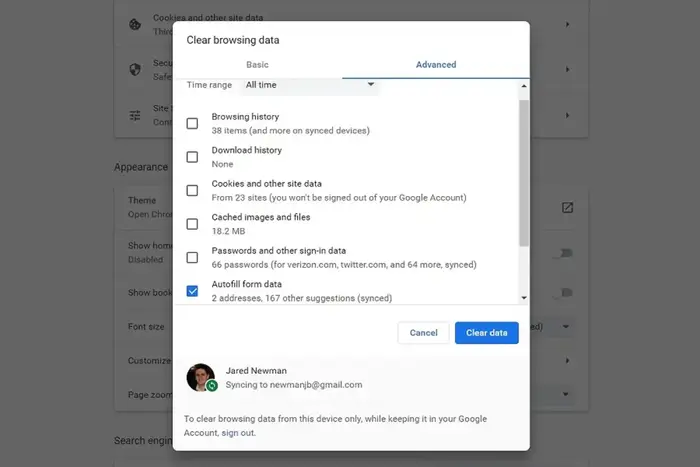
- Click the Advanced tab.
- Check the box labeled Autofill form data.
- Choose All time from the dropdown under Time range.
- Click Clear data to confirm the deletion.
Keep in mind that your saved Autofill data is linked to your Google account and stored in the cloud.
If synchronization is enabled, any updates or deletions will reflect across all devices linked to your account—whether it’s a smartphone, tablet, or another computer.
To remove Autofill data from your mobile device:
For Android and iOS:
- Open the Chrome app on your device.
- Tap the three dots (upper-right on Android, lower-right on iOS).
- Select History.
- Tap Clear browsing data….
- Ensure Autofill form data is checked.
- Set the Time range to All time.
- Tap Clear data to complete the process.
Turning Off Autofill Features in Chrome
If you’d rather not have Chrome offer to save passwords or other form data, you can disable Autofill features entirely.
To turn off password saving on desktop:
- Open Chrome.
- Click the three-dot menu.
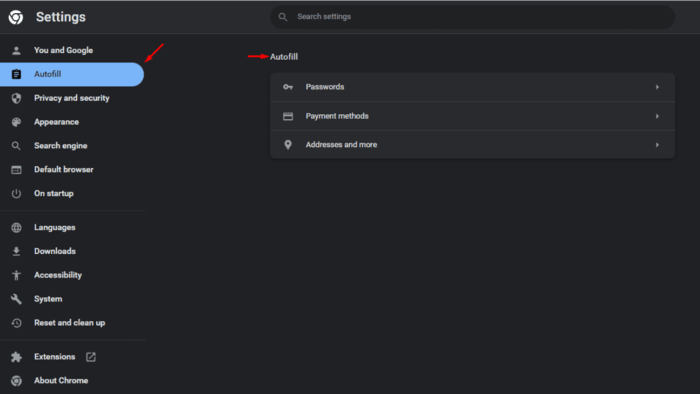
- Go to Settings and click on Autofill and passwords.
- Select Google Password Manager.
- Under the Settings section, turn off the toggle next to Offer to save passwords.
On Android or iOS:
- Launch the Chrome app.
- Tap the three-dot icon.
- Tap Settings > Autofill and passwords.
- Select Password manager.
- Tap the gear icon (Android) or select Settings (iOS).
- Turn off Offer to save passwords.
To disable Autofill for payment methods and addresses:
On desktop:
- Go to Settings > Autofill and passwords.
- Click Payment methods and switch off Save and fill payment methods.
- Click Addresses and more, then disable Save and fill addresses.
On mobile devices:
- Open Chrome and tap the three-dot icon.
- Choose Settings.
- Tap Payment methods to turn off Save and fill payment methods.
- Tap Addresses and more to turn off Save and fill addresses.
Editing or Updating Autofill Data
You can also update or add new entries to your Autofill list, such as a new address or a new credit card.
On a desktop:
- Open Chrome and go to Settings.
- Click Autofill and passwords.
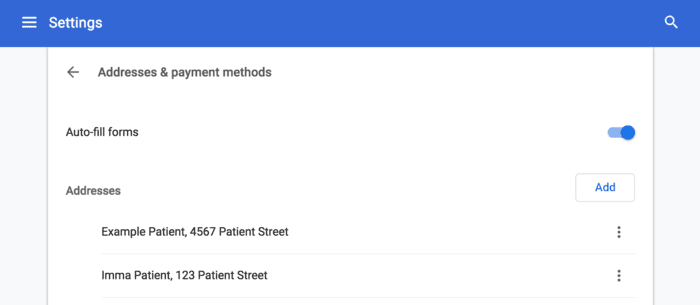
- To update addresses, click Addresses and more, then either click Add to enter new info or click the three dots next to an existing address to edit or delete it.
- For payment methods, go to Payment methods, click Add, and choose to enter a credit/debit card or IBAN. Save your changes.
- To modify or delete existing entries, use the three-dot menu next to each entry.
On Android and iOS:
- Open Chrome on your device.
- Tap the three-dot icon and go to Settings.
- To update a password, go to Password manager, select the saved item, and tap Edit.
- To change card details, tap Payment methods, select the card, make your changes, and hit Done.
- To change your address, tap Addresses and more, select the address, update the fields, and tap Done.
Removing Saved Login Info for a Specific Website
You might not want Chrome to remember login details for certain websites. You can remove individual entries as follows:
On desktop:
- Go to Settings > Autofill and passwords > Google Password Manager.
- Locate the website from the list.
- Click the entry you want to remove and hit Delete.
On Android and iOS:
- Open the Chrome app.
- Go to Settings > Password manager.
- Choose the site from the list.
- Tap the saved credential and select Delete.
Once deleted, Chrome won’t suggest these login details for the site. If prompted to save the password again, you can simply decline.
Is Chrome Autofill Safe to Use?
While Chrome’s Autofill feature is convenient, it may not offer the level of security you expect.
Because most users remain signed into their Google accounts, their Autofill data is protected only by their device’s lock screen and Google account password.
If someone gains physical access to your device and bypasses the lock, they could potentially access all of your saved passwords and payment details.
Frequently Asked Questions
How can I delete specific Autofill entries in Chrome?
You can go to your Autofill settings in Chrome, find the entry you want to remove—such as an outdated address or an old credit card—and delete it manually. You also have the option to turn off Autofill entirely.
Is it a good idea to turn off Chrome Autofill?
For better security, especially when handling sensitive information like passwords and bank details, it’s generally safer to use a professional password manager instead of relying on Chrome’s built-in tools.
What should I do if Chrome Autofill stops working?
Try clearing your browser’s cache and cookies, and ensure that you’re running the latest version of Chrome.
Outdated browser versions or corrupted cache files can interfere with Autofill performance.