The “Error Configuring Network” message appears when your Chromebook struggles to establish a connection with your wireless network. This network configuration problem prevents internet access and stops you from using most Chromebook features.
The error typically occurs during initial setup or when connecting to new networks. Understanding how to resolve this issue quickly restores your device’s functionality. This guide walks through proven methods to fix Error Configuring Network on Chromebook so you can get back online without hassle.
How To Fix Error Configuring Network on Chromebook?
Enable Network Sharing
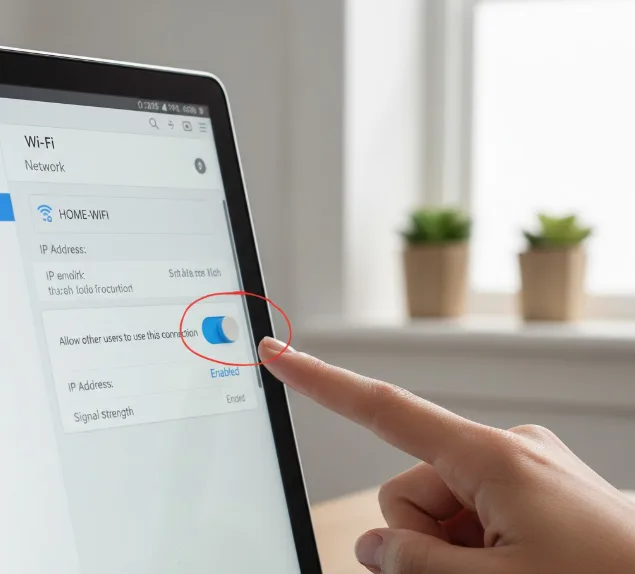
Network sharing allows multiple users to access the same connection on your Chromebook. This setting often resolves Error Configuring Network on Chromebook issues.
Click the time in the bottom-right corner of your screen. Select the Wi-Fi icon and choose your network. Click the network name to open detailed settings.
Look for the option labeled “Allow other users to use this connection” and enable it. Save the network and attempt to reconnect.
Verify Your Wi-Fi Password
An incorrect password is the most common cause of network configuration errors. Type your Wi-Fi password into a text editor first to ensure accuracy.
Enter the password carefully when connecting to your network. Pay attention to uppercase letters, lowercase letters, and special characters.
If you still use the default router password, consider changing it for better security.
Restart Your Chromebook
A simple restart clears temporary glitches that cause Error Configuring Network on Chromebook. Click the time in the bottom-right corner and select the power icon.
Choose “Shut down” and wait 30 seconds. Press the power button to turn your Chromebook back on.
Try connecting to your wireless network again after the restart completes.

Power Cycle Your Router
Router issues often cause network configuration errors on Chromebooks. Unplug the power cable from your router and wait two full minutes.
This process eliminates residual power and resets the router’s temporary memory. Plug the router back in and wait for all indicator lights to stabilize.
Attempt to connect your Chromebook to the network once the router finishes rebooting.

Forget and Reconnect to the Network
Removing the saved network configuration forces your Chromebook to establish a fresh connection. Open your Wi-Fi settings and locate your network name.
Click the network and select “Forget” or “Disconnect.” Wait a few seconds before attempting to reconnect.
Enter your password and check if Error Configuring Network on Chromebook still appears.
Use a USB Ethernet Adapter
Wired connections bypass Wi-Fi configuration problems entirely. Most Chromebook models lack an Ethernet port, but USB Ethernet adapters provide a stable alternative.
Purchase a compatible USB-to-Ethernet adapter and connect it to your Chromebook. Plug an Ethernet cable from your router into the adapter.
Your Chromebook should connect automatically without requiring additional configuration. This solution works well when troubleshooting persistent Wi-Fi issues.
Try Guest Mode
Guest Mode helps identify if the problem relates to your user profile. Sign out of your Chromebook account completely.
On the login screen, select “Browse as Guest.” Attempt to connect to your Wi-Fi network while in Guest Mode.
If the connection succeeds, the issue likely stems from your user profile settings rather than network configuration.
Connect to a Different Network
Testing with an alternative network determines whether the problem is network-specific. Create a mobile hotspot using your smartphone and connect your Chromebook to this temporary network.
If your Chromebook connects successfully to the mobile hotspot, your primary router may need attention. Contact your internet service provider if other devices also fail to connect.
Perform a Powerwash
A factory reset eliminates deep software problems causing Error Configuring Network on Chromebook. Back up important files to Google Drive before proceeding since Powerwash deletes all local data.
Open Settings and navigate to Advanced settings. Click “Reset settings” and select “Powerwash.”
Follow the prompts to reset your Chromebook to factory condition. Set up your device again and try connecting to your network.
What Causes Error Configuring Network on Chromebook?
Several factors trigger Error Configuring Network on Chromebook. Incorrect password entry prevents successful authentication with your wireless network.
Network sharing settings sometimes block connection establishment on managed or restricted networks. Outdated Chrome OS versions may contain bugs affecting network configuration.
Router firmware issues or unstable Wi-Fi channels cause intermittent connection problems. Temporary software glitches interfere with the network configuration process.
Hardware failures in the Wi-Fi adapter rarely occur but prevent all wireless connections. Understanding these causes helps you apply the most effective solution.
FAQs
Can I fix Error Configuring Network on Chromebook without a router restart?
Yes. Enable network sharing, verify your password, and restart your Chromebook first. These steps often resolve the issue without touching your router.
Why does Error Configuring Network appear only on my Chromebook?
Chromebooks handle network authentication differently than other devices. Check if network sharing is enabled and verify your Chrome OS is updated to ensure optimal connectivity.
Will Powerwash delete my Google Drive files?
No. Powerwash only removes locally stored files from your Chromebook. Files saved to Google Drive remain safe and accessible after the reset completes.
Does Error Configuring Network mean my Chromebook is broken?
Not usually. This error typically indicates a software or configuration problem. Hardware failure is rare and would prevent connections to all networks.
Can VPN cause Error Configuring Network on Chromebook?
Yes. Disable your VPN before connecting to a new network. VPN software sometimes interferes with initial network configuration and authentication processes.