This comprehensive article will walk you through installing and using Wine 9.0 or a newer version on your Chromebook.
Wine is a compatibility layer, enabling users to run Windows applications on Unix-like operating systems, including the Linux environment available on many Chromebooks.
This powerful capability can significantly expand the range of software options available on your device, allowing you to run programs that may not have native support for Chrome OS.
Important Note: This tutorial is tailored explicitly for Chromebooks equipped with Intel or AMD processors that support Linux Apps.
Unfortunately, if your Chromebook is built with ARM64 architecture, this installation method will not apply.
Requirements Before You Begin

Before digging into the installation process, ensuring your Chromebook is set up correctly is crucial. Here are the prerequisites you need to fulfill:
- Linux Apps Support: Verify that your Chromebook has Linux Apps support enabled. To check this:
- Go to Settings on your Chromebook.
- Scroll down to Advanced Settings.
- Under the Developers section, ensure that the Linux development environment is activated.
Once you have confirmed that Linux Apps are enabled, you can proceed with the installation steps.
Step-by-Step Installation Of Wine 9.0 on Chromebook

The following steps outline how to install Wine on your Chromebook effectively. Be sure to follow them in the exact order specified to avoid any issues:
- Open the Linux Terminal:
- You can find the terminal application in your app drawer. Click on it to open.
- Enter the Commands:
- Type or paste the following commands one at a time into the terminal, pressing Enter after each command:
- sudo dpkg –add-architecture i386
- This command enables 32-bit architecture support, essential for running many Windows applications that rely on this architecture.
- wget -nc https://dl.winehq.org/wine-builds/winehq.key && sudo apt-key add winehq.key
- This command downloads the Wine repository key and adds it to your system. This step ensures that your system can verify the authenticity of the Wine packages you will install.
- echo “deb https://dl.winehq.org/wine-builds/debian/ bookworm main” | sudo tee /etc/apt/sources.list.d/wine_chrome_os_made_simple.list
- This command adds the Wine repository to your package sources. By doing this, your system will know where to find the Wine packages when you initiate the installation.
- sudo apt update
- This command updates your package list, allowing your Chromebook to retrieve the latest information about available packages, including those from the Wine repository you just added.
- sudo apt install –install-recommends winehq-stable nemo winbind
- This command installs Wine and additional recommended packages: Nemo (a file manager) and Winbind (enabling Wine to interact with Windows networks).
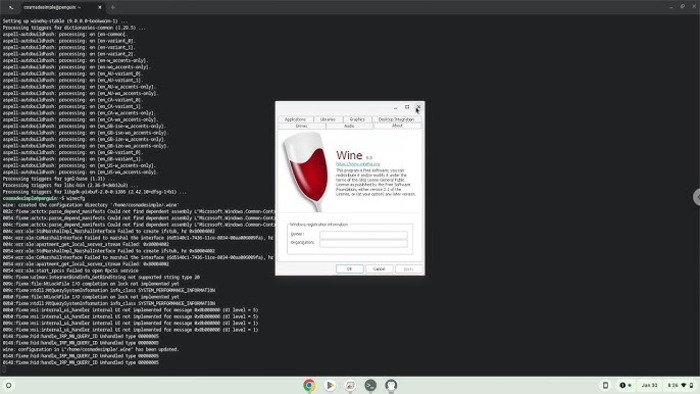
- winecfg
- Running this command initializes the Wine configuration. This step creates the necessary directories and files Wine requires to function correctly on your system.
- ln -s /home/$USER/.wine/drive_c /home/$USER/wine
- This command creates a symbolic link to your Wine C: drive in your home directory, making accessing your installed Windows applications easier.
Wine 9.0 on Chromebook: Installation Process

Let’s break down the significance of each command for a more precise understanding:
- 32-Bit Architecture Support: The first command is essential because many Windows applications are designed for a 32-bit environment. By enabling this support, you ensure that a broader range of applications can run smoothly.
- Adding the Wine Repository: The subsequent commands for downloading the repository key and adding the Wine repository are critical steps. They allow your Chromebook to access the most up-to-date version of Wine directly from the official source.
- Updating Package Lists: Running sudo apt update is crucial as it refreshes your system’s package database. This action ensures that your installation is based on the latest available versions.
- Installing Wine and Additional Tools: The installation command incorporates not just Wine but also valuable tools like Nemo and Winbind. Nemo provides a more user-friendly file management experience, while Winbind enhances Wine’s network functionality.
- Initial Configuration of Wine: The winecfg command is essential for setting up the Wine environment. It helps create configuration files and folders, making the software ready for use.
- Creating a Shortcut: The last command simplifies the access to your Wine C: drive. This symbolic link provides a quick way to go to where your Windows applications are installed, making the user experience smoother.
How to Use Wine Effectively?
Once Wine is successfully installed on your Chromebook, you can start using it to run Windows applications. Follow these simple steps:
1. Download a Windows Application:
- Look for a Windows application you wish to install. Ensure it is in the .exe format, the standard executable format for Windows programs.
2. Open the Application with Wine:
- Right-click on the downloaded .exe file.
- Choose to open with Wine Windows Program Loader from the context menu. This action will launch the application installation process.
3. Follow Installation Prompts:
- Proceed through the installation wizard as you would on a traditional Windows PC. Follow the on-screen instructions carefully.
4. Launch Your Application:
- After the installation, you can find the application in the Linux Apps menu or by locating its icon in the file manager. Click on the icon to launch your application.
Keep in mind that not every Windows application will run flawlessly with Wine.
Some applications may encounter issues, or certain features may function differently than intended.
Therefore, it is always advisable to check the Wine AppDB.
This database contains user reports and information on the compatibility of various applications with Wine.
Example Application: Your Only Move Is HUSTLE
To illustrate Wine’s capabilities, we tested the game Your Only Move Is HUSTLE with Wine. This game can be downloaded from IvySly.
Following the above steps, you can run this game successfully on your Chromebook.
Troubleshooting Common Issues

If you experience any difficulties while using Wine, consider the following troubleshooting tips:
- Update Wine Regularly: Always ensure you are using the latest version of Wine. Updates often contain bug fixes and improvements that enhance compatibility.
- Experiment with Windows Version Modes: If an application is not working as expected, you can try running it in different Windows version modes. This option is available in the winecfg settings, where you can select the Windows version that best matches the application’s requirements.
- Consult Online Resources: Online forums and the Wine AppDB can be invaluable resources for troubleshooting specific application issues. Many users share their experiences, which can help you find solutions.
- Install Additional Libraries: Some applications may require extra Windows libraries. These can be installed using Winetricks, simplifying the setup of the necessary components.
Conclusion
Installing Wine on your Chromebook can significantly enhance its functionality, allowing you to access a range of Windows applications that would otherwise be unavailable.
While it may not provide a perfect solution for every Windows program, Wine remains a powerful tool that expands your Chromebook’s capabilities.
Following this guide, you can install and utilize Wine, opening up a world of software possibilities.
For further details about Wine and its various features, please visit the official Wine website at WineHQ.
Enjoy exploring the benefits of Wine on your Chromebook!

