Picking a video-to-video tool for podcast promos seems simple until you need to turn a basic interview teaser into something branded and ready for social. Plenty of AI tools can create eye-catching visuals. Fewer can restyle an existing clip without turning the process into another editing job.
That is the real filter. For podcast teams posting teaser clips on Instagram and LinkedIn, three things matter most: how easily the tool restyles existing footage, how many visual directions it can handle without breaking motion continuity, and how quickly the result moves into publishing.
Quick Comparison Table
| Tool Type | Ease of Restyling Existing Clips | Style Variety With Motion Continuity | Output Handling for Publishing |
|---|---|---|---|
| Media.io | High. Built for quick upload-to-style workflows | High. Offers a good range of visual directions while preserving motion and scene continuity | Smooth. Preview, export, and continue in an integrated workflow |
| Advanced editing-heavy platforms | Medium to low. Powerful, but often slower for simple teaser variations | High, but usually requires more manual setup and deeper editing knowledge | Strong, though the workflow can feel heavy for small social tasks |
| Single-style niche generators | High for basic use | Low to medium. Fast, but often limited to one visual look or narrow effect range | Simple, but less flexible when multiple branded versions are needed |
For teams that want to test several promo looks from one interview clip instead of rebuilding each version by hand, an AI video style tool is usually the more practical fit. Media.io works well here because the workflow stays browser-based and focused on video style transfer instead of pulling you into a full post-production stack.
What The Table Means For This Task
For podcast promos, frame-by-frame control is not usually the first priority. Speed is. Most teams already have the footage they want to use. The challenge is turning one talking-head teaser into a few distinct versions that feel right for different channels or campaigns.
That is where a model-first workflow helps. Instead of relying on one narrow effect or a heavy editing process, Media.io lets you test different style directions while keeping the source clip recognizable. That makes it easier to compare moods for the same snippet and choose the version that fits the platform, the show, or the campaign.
How Media.io Handles The Workflow
The process is straightforward: upload the source clip, pick a style direction or template, adjust style strength, generate, then preview and export. You are working from existing footage, so the goal is not to rebuild the promo. It is to change the look without losing the structure that already works.
That matters for podcast clips because the original timing, expressions, and pacing usually do most of the communication. Media.io supports video style transfer while keeping motion and scene continuity usable, so the restyled version still feels connected to the source.
The integrated editor also helps if you need light cleanup after generation, and free daily credits make it easier to test before committing. One practical limitation: if you want more advanced variation or a very specific look, you may need a subscription or a few regeneration attempts.
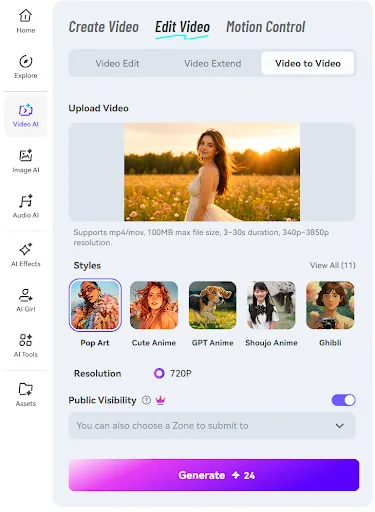
Step 1. Upload Your Source Teaser Clip
Open Media.io and go to the video-to-video tool. Upload the interview teaser you already plan to post, ideally a short segment with clear framing and a strong quote.
Short, clean clips usually give you a better starting point. It makes sense to begin with one strong excerpt rather than a full episode segment.
Step 2. Choose a Style Direction and Adjust Strength
Pick a visual style or template that matches the channel and the podcast’s branding. This is the main creative decision. You are not changing the content of the clip; you are changing how it feels.
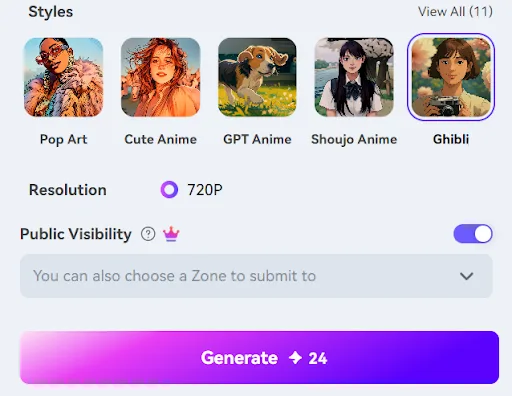
A more polished cinematic treatment may suit LinkedIn, while a more animated or stylized look may play better on Instagram. Style strength matters too. If it is too light, the clip may not feel distinct enough. If it is too strong, the result can start to look less credible than you want for a podcast promo.
Step 3. Generate, Preview, and Export the Best Version
Generate the clip, preview the result, and export the version that works best. Pay attention to motion consistency, face clarity, and whether the effect supports the speaker instead of distracting from them.
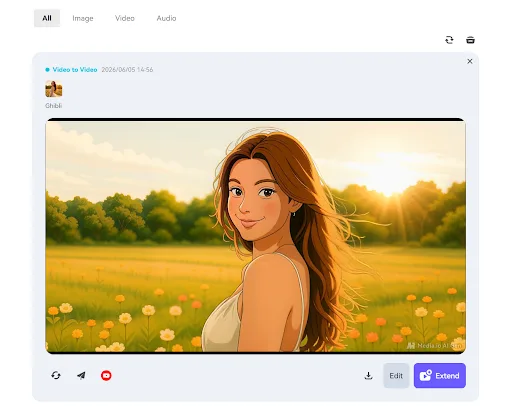
It is worth comparing more than one result before you choose a final version. Once you have the strongest cut, you can move it into the usual publishing step for captions, scheduling, or channel-specific packaging.
Who Should Use This Approach
This approach fits podcast teams, solo hosts, and social managers who already have interview footage and need more than one teaser look from the same clip. It is especially useful when the goal is repackaging rather than rebuilding.
Editors who want deeper manual control may still prefer desktop-heavy tools. But for teams that care more about faster branded restyling and less tool switching, this workflow is a better match.
Final Verdict
For podcast teaser clips, Media.io makes the most sense when the job comes up often: take an existing interview promo, test a few visual directions quickly, and move the result into publishing without a long extra edit.
The advantage is practical. You can restyle faster, compare versions more easily, and keep the handoff to publishing simple. If that matches the way your team works, the next step is easy: take one of your existing teaser clips and test two different looks to see which version fits your channels best.
FAQs
Is Video-To-Video Better Than Re-Editing Podcast Promos From Scratch?
Usually, yes, when you already have usable footage. Video-to-video lets you reuse the original timing, motion, and structure of the clip, which saves time and cuts down on manual editing.
Can One Source Clip Be Restyled For Different Channels?
Yes. The same teaser can be given different visual moods for different posting contexts without changing the underlying clip.
What If I Need A Very Specific Brand Look?
That is possible, but it may take some testing. Start with a style direction that is already close to your brand, generate a few versions, and review the results. If the look needs to be extremely precise, a more manual editing workflow may still be useful for final polishing.