Google Photos now includes a video editor for Chromebooks, marking a welcome upgrade from the previous basic version. This feature lets you trim clips, adjust colors, apply filters, and create simple movies directly within the Photos app.
If you own a Chromebook and want to edit videos without purchasing separate software, learning how to use the Google Photos video editor on a Chromebook gives you a free option for basic editing tasks. While it won’t replace professional tools, it handles straightforward projects like combining vacation clips or creating short presentations.
The editor runs through the Android version of Google Photos, so you’ll need the Play Store app installed and updated on your device.
How to use the Google Photos video editor on a Chromebook
Update your Google Photos app
Open the Play Store on your Chromebook and search for Google Photos. Check if an update is available and install it. The new video editor requires the latest version of the app to function properly.
Without this update, you won’t see the editing features described in this guide.

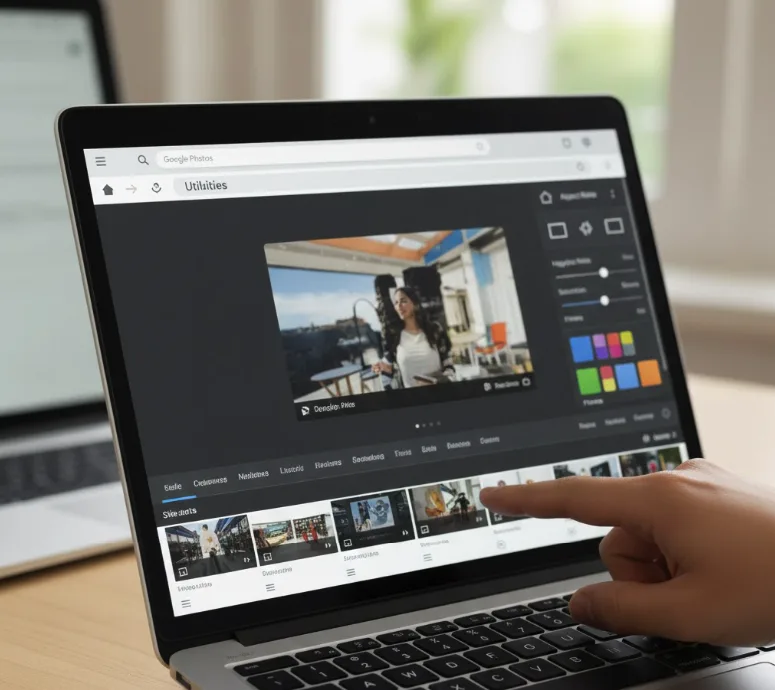
Access the video editor through Utilities
Launch Google Photos and look for “Utilities” in the left sidebar menu. Click it to open the utilities page.
Scroll down to the “Create” section and select “Movie.” You’ll see options for themed movies or creating a new movie from scratch.
Choose “New Movie” to start with a blank project.

Select your video clips and photos
The editor prompts you to import content from your Google Photos library. Search for specific videos or browse through your collection.
Select the clips and photos you want to include in your movie. You can choose multiple items at once.
Click “Select” or “Done” when finished choosing content. Google Photos will download these files to prepare them for editing.
Edit your video clips
Your selected content appears on a timeline at the bottom of the screen. Click any clip to trim its beginning or end by dragging the edges.
Reorder clips by clicking the two lines under each one and dragging it to a new position. Add more content using the “+” button on the timeline.
The right sidebar contains three editing options: aspect ratio adjustments, image enhancements (highlights, saturation, shadows), and filters similar to photo editing tools.
Add music if desired
Click the music button above the editing menu to browse soundtrack options. Google Photos organizes music by genre and mood.
Select a track to add it to your movie. You can remove it later if you change your mind.
Keep in mind that adding music will override any original audio from your video clips.
Export your finished movie
Click “Finish Movie” at the top right corner when you’re satisfied with your edits. Google Photos processes your video, which takes anywhere from a few seconds to several minutes depending on length and complexity.
You’ll receive a notification when processing completes. Find your finished movie in the “Creations” section of the main Google Photos menu.
Your movie saves to Google Photos automatically. Use the share button to upload it to platforms like YouTube, or download it to store locally on your Chromebook.
The Google Photos video editor offers basic functionality without cost. If you need advanced features like transitions or more comprehensive video editing tools for Chromebook, consider dedicated applications, though they typically require purchase.
FAQs
Can I use the Google Photos video editor offline?
No, you need an internet connection to access your Google Photos library and process videos through the cloud-based editor.
Does the video editor support transitions between clips?
The Google Photos video editor does not currently include transition effects. Clips play sequentially without fade or other transition options.
What video formats does Google Photos support?
Google Photos supports most common formats including MP4, MOV, AVI, and WMV files uploaded to your library for editing.
Can I edit 4K videos in Google Photos?
Yes, but Google Photos may compress 4K footage during processing. The output quality depends on your storage settings and file size.
Is the video editor available on all Chromebooks?
The editor works on Chromebooks with Play Store access. Older models without Android app support cannot use this feature.