


Beginners often wonder why their videos appear lifeless, even though they have used many transitions and effects. The cuts between clips are sharp, texts pop in clumsily, and nothing appears to flow from one moment to the next. Keyframing is the missing piece that allows you to control exactly how and when things move, zoom, or fade on screen.
By mastering this simple technique, you can instantly make your videos look more polished. In this article, we’ll explore Filmora keyframes and various keyframing methods so you get smooth video clips every time.
Part 1. What is Keyframing in Filmora?
A way to control movement, size, rotation, or transparency at certain points in your video is known as keyframe animation. This is done to enhance the focus or detail of a specific image for emphasis or storytelling.
Wondershare Filmora makes this process easy by letting users select any clip, text, or image and adjust its properties on the timeline.
Afterward, it automatically generates smooth transitions between those points, adding dynamic motion and professional polish without needing advanced editing skills. With such a tool, keyframing becomes easy, effortless, and fast.
Types of Keyframe Animation in Filmora Explained
Users can combine several creative types of motion when learning keyframing in Filmora, so let’s break them down clearly:
- Linear: Here, you move an object at a constant speed between two points. They are easy to understand but can look stiff or mechanical in motion.
- Curve: Create gradual, more natural transitions instead of straight, constant‑speed movement. Users shape the value graph to control how speed changes over time.
- Continuous Curve: These keyframes connect multiple curves smoothly without any sharp corners or breaks. They keep motion flowing naturally by aligning tangents where curves meet.
- Freeze: It pauses a specific frame so it holds like a still image. After the pause, playback continues normally, which is great for emphasis or narration.
- Ease In/Out: Such keyframes start or end motion slowly while moving faster in the middle. They mimic real‑world acceleration and deceleration, making animations feel smooth and realistic.
Part 2. Why Keyframing Is Important In Filmora Video Editing
For anyone learning the basics of video editing, keyframing is not just a fancy add-on. Actually, it directly affects how professional your video edits feel. Therefore, keyframe animation is central to several important improvements in your videos, as mentioned below:
- More Natural Motion: Removes choppy movements and replaces them with fluid transitions between positions. This makes camera moves, text, and graphics feel intentional instead of distracting.
- Creative Freedom: Decide exactly where an element starts, ends, and how it behaves in between. This control lets you precisely match movement to music, voiceover, or emotional beats.
- Professionalism: Keyframed moves and fades resemble those in polished YouTube videos and commercials. Even simple zooms and pans feel higher‑quality when animated rather than static shots.
- Better Storytelling: Guide the viewer’s eye to important details by zooming, panning, or fading at the right moment. This helps explain things clearly in tutorials, reviews, or educational videos.
- Efficient Use of Simple Clips: Instead of recording multiple angles, you can create motion within a single clip. Virtual zooms, pans, and reveals make basic footage look dynamic.
Part 3. How To Add Keyframes In Filmora: Step-by-Step Guide
As we have discussed keyframes and why keyframing is necessary for producing polished, professional videos, let us explore how to use Filmora step-by-step to add keyframes for better storytelling:
Step 1. Create a New Filmora Project
To begin, launch Filmora on your PC and start a new creative project by importing the desired video and dragging it to the editing timeline.
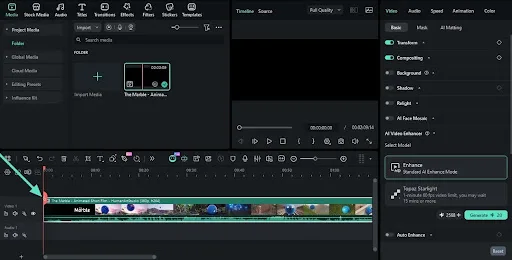
Step 2. Open the Keyframe Controls
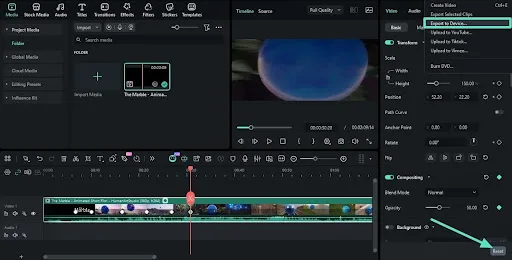
Now, in the upper-right section, you will see a “Video” tab. After clicking it, navigate to the “Basic” tab and then to the “Transform” section. Under it, you will see various keyframing options, such as “Scale,” “Position,” and “Rotate.”
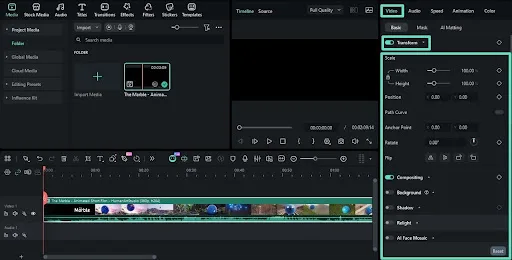
Step 3. Add Your First Keyframe
Next, move the playhead on the timeline to the place where you want to add a keyframe. Then click the “Add Keyframe” button and adjust the “Position” and “Scale” values to your preference.
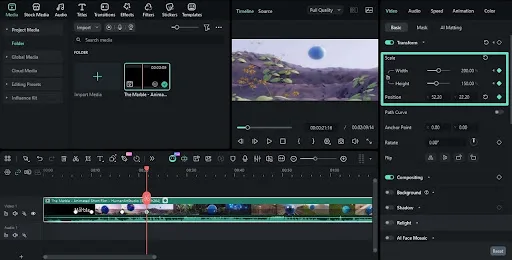
Step 4. Adjust Keyframes Throughout Clip
After you have adjusted the video to your preference, you will see “Add Keyframe” icons where your keyframes are located. Users can adjust them to the left or right to slow or quicken the motions.
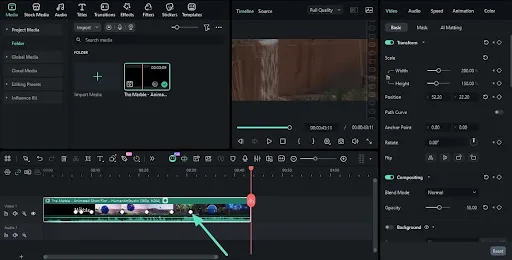
Step 5. Edit and Preview Before Saving
Then, if anything seems strange or awkward, click the “Reset” button at the very bottom of the “Transform” tab. Finally, once you are satisfied, click the “Export to Device” button to save the video.
Conclusion
In summary, we have seen how keyframing provides movement, zoom, rotation, and fades to clips. These effects turn a simple video into a dynamic, professional‑looking piece. With its user-friendly interface, Filmora makes video editing easy, so beginners are not confused.
For creators looking to push their motion design even further, pairing Filmora with Filmora.TV—the web-based visual AI canvas for concept planning and AI asset generation—offers a seamless workflow from raw inspiration to precise keyframed animations.
