Your Chromebook depends entirely on your Google account for access and functionality. This same account likely controls your email, photos, documents, and other critical services.
Without proper protection, someone could gain unauthorized access through methods like SIM-jacking. This happens when attackers impersonate you to your cellular provider and transfer your phone number to their device.
Once they control your number, they can reset your Google password using SMS codes. This locks you out of your Chromebook and exposes personal data, banking information, and files stored on Google Drive.
Protecting your Google account isn’t just about security. It’s about maintaining access to your device and safeguarding everything connected to that account.
How to protect your Google account on Chromebook
Follow these steps to secure your Google account and prevent unauthorized access to your Chromebook.
Enable two-factor authentication in your Google account
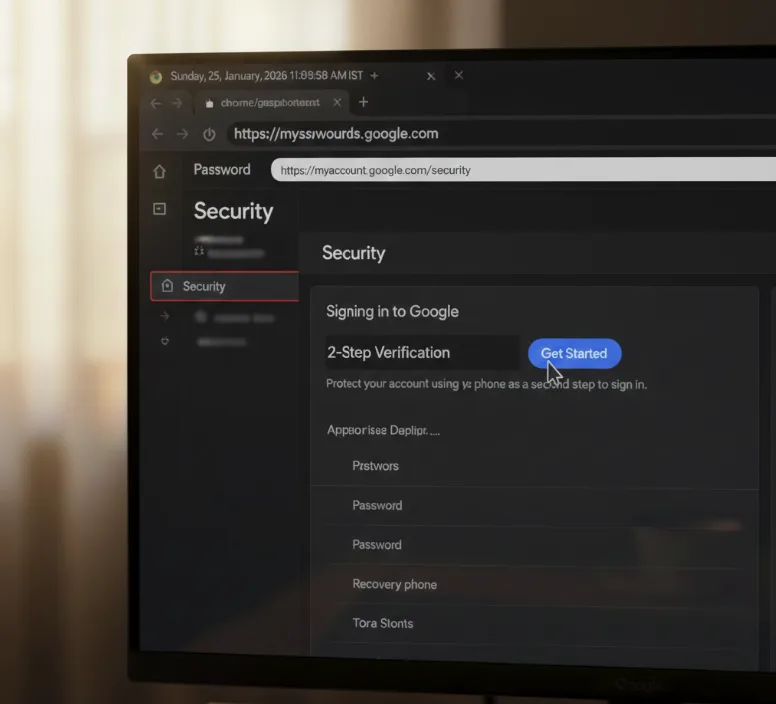
Open your web browser and navigate to your Google Account settings. Click on “Security” in the left sidebar. Scroll down to find “2-Step Verification” and click “Get Started.”
Google will walk you through the setup process. You’ll verify your identity and choose your preferred authentication method.
Choose a secure authentication method
Avoid using SMS codes as your primary method. SMS-based verification is vulnerable to SIM-jacking attacks where someone transfers your phone number to their device.
Select Google Authenticator app, hardware security keys, or Google prompts on your mobile device instead. These methods remain secure even if someone steals your phone number. Using a Google Titan Security key provides an extra layer of physical security for your account.
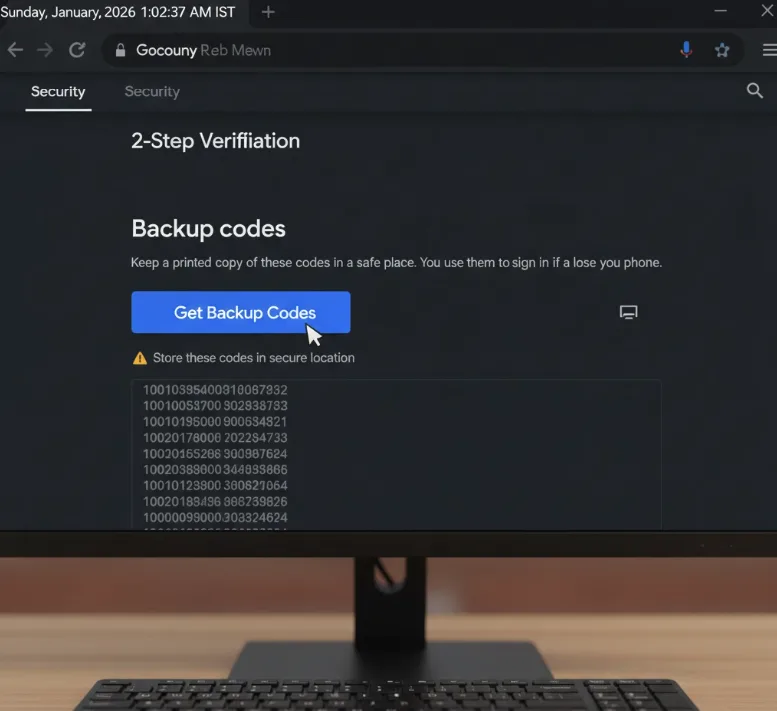
Set up backup authentication options
Generate and save backup codes from your Google Account security settings. Print these codes and store them in a safe location.
If you lose your primary authentication device, these codes provide emergency access. Keep them offline and never store them digitally where hackers might find them.
Enable two-factor authentication for Chromebook login
Navigate to your Chromebook settings and click “Security and Privacy.” Find the option to require authentication at login.
When enabled, you’ll need to provide your authentication code, approve a Google prompt, or use your hardware key every time you sign in. Don’t select “trust this computer” options if you want maximum protection.
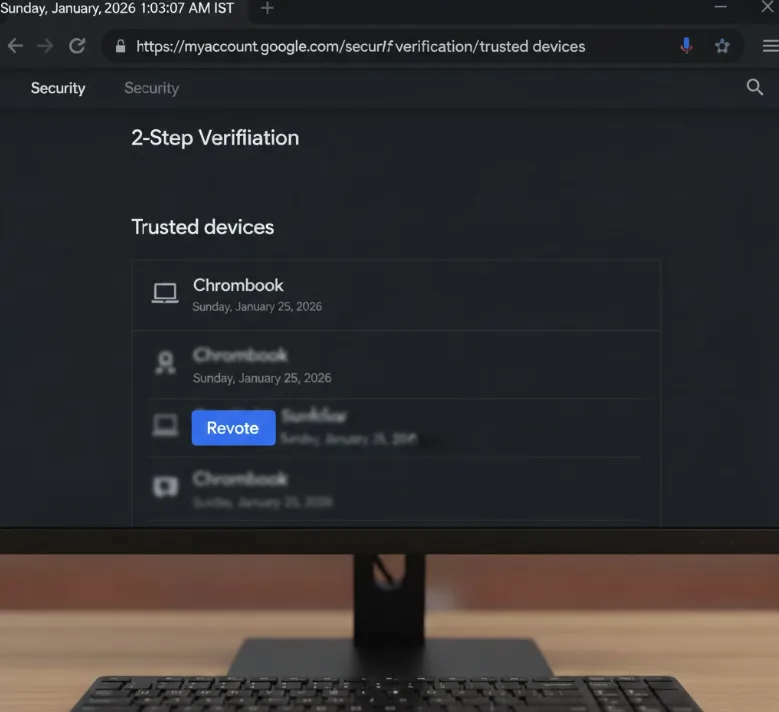
Remove trusted device status if needed
If two-factor authentication doesn’t prompt on your Chromebook, you may have previously set it as trusted. Visit your Google Account 2FA settings online.
Look for your Chromebook in the list of trusted devices. Click “Revoke” to remove its trusted status and require authentication on every login.
Store important files in the cloud
Never keep critical files only on your Chromebook’s local storage. If you lose access to your Google account, you also lose access to locally stored data.
Upload important documents to Google Drive or a secondary cloud provider. Delete files from your Downloads folder regularly unless you’ve backed them up to the cloud first.
Additional security measures for your Chromebook
Consider using a password manager to create and store strong, unique passwords for all your accounts. This prevents credential stuffing attacks where hackers use leaked passwords from one service to access others.
Review your Chrome extensions regularly and remove any you don’t recognize or use. Malicious extensions can compromise your account credentials and personal data.
For comprehensive protection, explore passkeys on Chromebooks as an alternative to traditional passwords. This technology uses encrypted credentials that can’t be phished or stolen through SIM-jacking.
FAQs
What happens if someone hacks my Google account on Chromebook?
They can change your password and lock you out completely. You’ll lose access to your Chromebook, locally stored files, and all Google services connected to that account.
Is SMS two-factor authentication safe for Chromebook?
No. SMS codes are vulnerable to SIM-jacking where attackers transfer your phone number to their device. Use Google Authenticator, hardware keys, or Google prompts instead for better security.
Can I access my Chromebook without my Google password?
No. Your Chromebook requires your Google account credentials to sign in. If someone changes your password, you can’t access the device until you regain control of your account.
Do I need two-factor authentication on every Chromebook login?
It’s optional but recommended. Requiring authentication at every login adds inconvenience but prevents unauthorized access even if someone obtains your password through other means.
Where should I store my backup authentication codes?
Print them and keep them in a physically secure location like a safe. Never store backup codes digitally or in cloud services where hackers could potentially access them.